Introduction To WPF
The Windows Presentation Foundation (WPF) Application Programming Interface (API) was introduced by Microsoft. It is a next generation UI framework to create applications with a rich user experience. It is part of the .NET Framework 3.0 and higher. WPF combines application UIs, 2D graphics, 3D graphics, documents and multimedia into one single framework. It's vector based rendering engine uses hardware acceleration of modern graphic cards. This makes the UI faster, scalable and resolution independent
It consists of two Files
1 - A Xaml File Which is used For Designers To Design a User Interface
2 - A Code Behind File For The Respective XAML File
1 - A Xaml File Which is used For Designers To Design a User Interface
2 - A Code Behind File For The Respective XAML File
Date Picker
The DatePicker control will be displayed pretty much like a regular TextBox, but with a small button which will bring up a Calendar-view when clicked, allowing your user to select the date.
Note: Getting a custom date Format is Very Simple But Unfortunately Any Source From Internet doesn't give me a clear picture to get a date Format string in WPF and Some References are bit complex i strongly believed it can be done in simple steps some how at the end of The day I figure it out
Here are Some Custom Date Formats
Note: Getting a custom date Format is Very Simple But Unfortunately Any Source From Internet doesn't give me a clear picture to get a date Format string in WPF and Some References are bit complex i strongly believed it can be done in simple steps some how at the end of The day I figure it out
Get Custom Date Format from Date Picker
So Finally I Followed The Following Steps and I Achieved getting a custom Date Format From a Date PickerHere are Some Custom Date Formats

Here I named my Xaml File as Sample.Xaml and Code behind File Sample.xaml.cs
Sample.xaml
Sample.xaml
<DatePicker Name="test"></Datepicker>
var x = (DateTime)test.SelectedDate;

string sample_date = x.ToString("yyyy-MM-dd");


Messagebox.Show(sample_date);
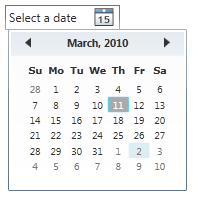
Date Picker contains a default place Holder with an Date icon on The right side of the "select date" place Holder
After clicking on The date icon you will get a calendar and after selecting a date it shows in The Text Box
By Adding name attribute with Some Value Ex:"test" you can access in code behind file of The respective file
In Sample.xaml.cs file The first line of the code in submit_click method There is a type casting to DateTime Class this is because You can't change format using ToString() method without type casting.
After Type casting You can change the string Format to any DateTime Formats using ToString().
Note:
1 - MM - Represents Month
2 - mm - Represents minutes
Steps to Proceed:
1- Create a sample WPF Project in Visual Studio 2019

2- Xaml Code

3- Code Behind File

3 - After Executing The above application it shows The following Result

4 - Now click the date icon on the right side of the selected date

executed in code behind file then a Message Box Will appear with custom date format(yyyy-MM-dd)as follows
